Peacock

Monday, May 9, 2011

Songs of Last Week

Oops! I did it again! Amidst all my crafting and studying I forgot to do a Songs of the Week post for last week! So here they are:

  1. New Fire by Sent By Ravens which you can hear here
  2. The Fight by The Classic Crime which you can hear here
  3. The Ticking Clock by Submission Red which you can hear here
And just in case you don't feel like clicking and going to a new page, here are the videos right here!! :)

New Fire

The Fight

The Ticking Clock

Hope you are all having a FANtastic Monday! :)


A Procrastinator's Mother's Day

Yesterday was Mother's Day! Yaaaay for mothers!! :) And true to my procrastinator-self I waited 'til the last minute to start making my mother's day gift. I knew what I was going to do! I just hadn't started it yet...

Here was the plan! I was going to go to Home Depot, get a tile, then print out this cute mother's day printable and make coasters!


Then I was going to make this thingy that I found on Pinterest:


And I was going to do all of that on Saturday. Except...Blake and I forgot. I know! We're terrible! We remembered at about 7:15 Saturday evening and we didn't have anything to make this stuff with! So off to Wal-Mart we went. The plan was to get really cheap frames to put that "I heart you because" in it, but there weren't any white cheap frames and we were afraid that if we tried to paint a crappy frame that it wouldn't work right and we would just waste all of our paint for nothing. We did find some frames there that we liked, but they were $10 each, and that isn't "cheap" to us. So we went to Dollar Tree. Nothing there either. Why are white frames so hard to find??? Ugh, anyways, we went to Home Depot next and got the tiles for the coasters. Unfortunately we didn't look at the tiles really closely because we ended up getting counter top tiles so they had one rounded edge :( We didn't realize that until we got home though so we just had to go with it. On our way home we stopped and picked up the two $10 frames that we I put back in hope of finding cheaper ones.

Once at home, we started with the coasters. Then I realized, poop! We don't have a color printer! So I photoshopped the image, and made it to where we could color with markers inside the lines (Mom's like that kind of stuff, right?). Well, it just didn't quite look right. You could see the lines, I couldn't decide on colors, and then when I ModPodged it, it got all bubbly and the colors bled...see? (That was after I took it off the tile)


After seeing that, Blake wanted to try something new for sure. So off to Dremmel land he went! He wanted to etch the "I Heart Mom" and then paint over it. He's so dang creative...ugh. lol But unfortunately it didn't work out :( He tested it out on the bottom of the tile and it was turning it black because the speed of the dremmel was burning it so he was afraid it would look weird so he opted out. Also keep in mind this was at like 11:30 so I don't blame him for giving up :) I couldn't though! I was on a crafting mission! So I thought through a couple of different options. Try it again but give the markers more time to dry, just put the cardstock on the tile and draw on it, or paint the tile directly. I went with the third choice! And I just used regular acrylic paint! You'll definitely have to modpodge the acrylic paint though because it wanted to chip right off! Here's how it turned out:


Then I just hot glued some felt feet on it and voila! Mother's Day coaster!! The super bright yellow paper was just my painting backdrop btw :) You can definitely tell that I made it. It doesn't look fantastic, but my mom still liked it! So that's okay! :)

Then I moved on to the printing part of the evening! (at like 1:00 a.m.) I found some fonts on dafont.com (weird name, but they have a huge selection!) and used those! Here is Blake's mom's:


And here is my mom's:


I didn't look at my Pinterest picture at all during this, which is why there is no mat on mine. Darn it! I totally could have made that happen! Those frames came with mats! Poop. Oh well! I think they like them anyway :)

Then I started the clean up process (wouldn't want my hubby to wake up to go to church and see a messy house!) And then I wrapped everything and made it ready to go for in the morning and finished right at 2:00 a.m.!


And yes, that is tissue paper used as wrapping paper! We have a million rolls of wrapping paper but they are all Christmas wrapping paper!!! So tissue paper it was! And that is the end of our Mother's Day gift extravaganza!

We gave them to our moms and they loved them! We wrote on Blake's mom's "of your creativity!" (I heart you because...of your creativity!) and I told my mom that if I had a marker on hand (it was still in gift paper) that I would write "it's mother's day" (today is a  fantastic day because...it's mother's day!).

So what did you guys give your moms for Mother's Day?

Friday, May 6, 2011

Houston We Have An Update

Blake and I have done some more organizing and shelf-putting-together in our garage! We still have a few more things to do, but here's what it looked like after Tuesday's post:


And here's what it looks like after assembling another shelf and cleaning out some more stuff:


In all honesty, it doesn't look that much better, but we're taking baby steps :) And! We cleaned out a section of our garage that looked like if you touched it, a spider would eat you! Unfortunately I fail at taking before pictures so I totally forgot until we were almost done...I was all in the moment you know? However, I did remember the after picture! Here it is:


See that row of shoes? Here's a closer look:


Apparently some spiders needed a place to stay for a while, so they took up residence in my husband's shoes. I don't blame them since some of those shoes have been out there for like a year! And we broke our shop-vac while cleaning up our washing machine mess last weekend, so the spiders get a couple more days of housing until Blake and I can go get a new filter!

Anywho, back to the shelving part. We realized while organizing the garage the first time that we really don't have that much stuff. So we decided to assemble the second shelf in more of a workbench/table manner. Here's what it looked like: Oh! And we also moved the first shelf over a bit...


That way we still get some storage, but we can also build things out there or Blake can fix computers out there and not have to worry about dirtying up our house!

Eventually we'll get a stool or two but for now we're using that random office chair that I got as a wedding present from my boss right after she told me we were closing in two weeks. Lol Still grateful though!


We'll probably put a lamp in between the tall shelf and the workbench area to give the worker more direct light and also make this look a bit more cohesive. We also need to figure out what to do with the rest of the stuff in the garage that doesn't belong. Here are our plans so far:


So there you have it! Our baby steps into the organizing direction! Yay! :) Have you guys taken any baby steps that way? Or have you been totally awesome and taken adult steps in that direction?

Thursday, May 5, 2011

No Sew Envelope Pillow Tutorial

As I mentioned in this post, I searched forever for some cute outdoor pillows but to no avail, so I had to make some! And I can't sew....so I just had to rely on my stitch witchery and my creativity! Here's how they turned out:


Here's the steps to making your own no sew envelope pillow!

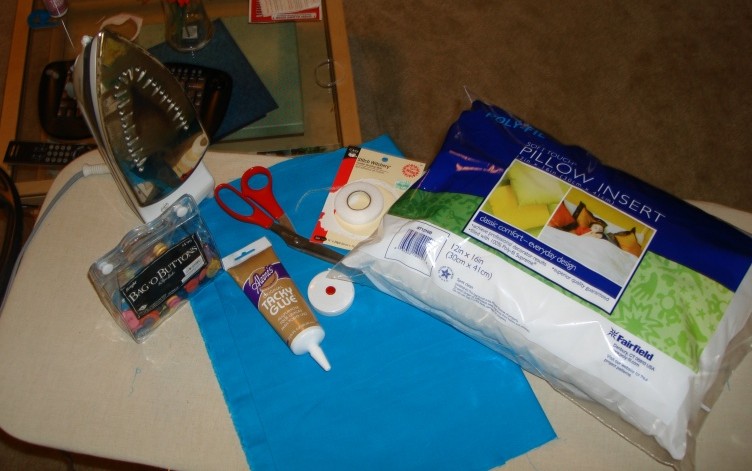
1. Gather Materials!


Here's what you'll need:
  • A Pillow (mine was 12"x16" from Wal-Mart)
  • Fabric (I got 2 yards to be safe)
  • Stitch Witchery (available at craft stores, I got mine from Hobby Lobby for $2.29)
  • Measuring Tape
  • Glue
  • Scissors
  • Two Buttons
  • Ironing Board
  • Iron
  • Velcro 
  • Ribbon
2. Measure your fabric

I cut my fabric to be all one piece. It makes it easier to keep things straight and you use less stitch witchery! For the width of the fabric, add one inch to the length of the pillow so you have enough room for a half inch seam on either side (for mine it was 17"). For the length of the fabric, double the width of the pillow and add half of the width of the pillow plus two inches for the seams. So for mine, which was 12", it was 12+12+6+2=32". (if you look at my picture, you'll see 31", but I would recommend adding an extra inch)

3. Cut your fabric

4. Iron Fabric so you don't have any of those nasty wrinkles on your super cute pillow :)

5. Fold your fabric to make a place for your pillow: (make sure if you're using a print that the print you want to show is face down)


Measure the width of your pillow (mine was 12") and add one inch for the seam and iron. That will make a nice fold so you don't have to worry about the measurements changing while you're making the seams and stuff. Also, to be sure your fold is even, check for symmetry by measuring different parts of the fold to be sure they are all 13" :)

6. It's time for the stitch witchery!


Place the stitch witchery between the fabric that you just folded. Then iron with the steam setting on (the stitch witchery package tells you how to do this). Do that on both sides :)

7. Flip your fabric inside out (make sure the fabric is cool so that the stitch witchery has had time to bond your fabrics together)

8. Check to be sure your pillow fits!

9. Fold the raw edges of the top piece towards the middle (about 1/4") and stitch witchery to create a pretty seam!


10. Glue Velcro sections on the top piece and where your pillow will sit so that the top piece doesn't come open.

Start by gluing down one half of your velcro (like the soft side) where the top piece naturally lays.

Then fold your top piece over and mark with a pen on the top piece where the Velcro touches.


That is where you will put your glue dot


Then put your other half of the Velcro set (like the coarse side) on your glue dot


11. Glue your button on where you would like it to go:


12. If you are making an outdoor pillow, use ribbon to secure your pillow to the outdoor furniture.

Place your pillow where you want it to sit and make a small mark for where you need your ribbon to sit:

Then glue your ribbon on top of the mark you made.


And tie a cute bow to keep your pillows in place!


And there you have it! Cute envelope pillows that required no sewing! YAY! :)
Here's some more pics if you couldn't really tell what they looked like:


In all honesty, I will probably be re-making the one on the right. I cut the length too short, so the envelope part doesn't come down far enough. I thought it wouldn't bother me, but so far it's driving me NUTS! It's not like it takes a lot of effort or money...so you may be getting an update soon with pillows that look a little more the same size lol. But it was fun figuring this out and I love that I got exactly what I wanted on my porch! I still have a few more things I want to do, like add a wreath to the door, some fabric to the table, and a plant somewhere up there but for now I'm super happy with my pillows!

What do you guys think? Have y'all attempted to make something after not finding what you wanted at a store somewhere? How did it turn out?

The Circle of Life

As you know, I've been trying to up our curb appeal lately so we can sell our house. It started with sprucing up the garden area, then buying some outdoor furniture from Ikea, and then I just needed some extra color to draw eyes to our house! I searched FOREVER for pillows and accessories for our patio furniture, trying to decide what color, what I wanted on the table, how much I wanted to spend, you know all the fun stuff that comes with decor decisions. I found these on Pier 1's website and immediately fell in love:
What I didn't love was the price...okay the price isn't that bad, I'm just super cheap frugal, and I didn't want to pay $40 for two pillows! But I finally just gave up after searching around for a better deal for another 2 weeks and debating whether I should just make one. I decided to buy these, because the price difference between me making some and having them already made and cute was just not that much. So off to Pier 1 I went! 

When I got there though, I saw that my monitor's colors must be way off, because the color of the actual pillows were waaay darker and really not a cute springy color like at all. But I figured I would give them a try, I could always return them, right? So I purchased them with a Visa gift card from my aunt and went on home. I also bought this thing for the table which I totally love:

So I get home and sure enough, I hate the pillows. They're just too dark. I want something that makes me smile and think spring when I'm walking into my house! So back to Pier 1 I went. Unfortunately, the gift card which I thought was reloadable was not reloadable at all so I got stuck with a Pier 1 gift card instead. Which stinks because I could have used that gift card to get the fabric for the pillow I was now going to have to make, but it doesn't stink too much because it's still Pier 1 which is totally awesome. :)

So, that is the story of the circle of life, or at least the circle of patio decor decisions. I ended up making the pillows for outside, and I will be putting up a tutorial shortly about that! Spoiler Alert: I can't sew, and I wanted a pillow that looked a lot like the ones from Pier 1!

Has this happened to y'all? Went around and around in your head, finally decide, and then realize that what you thought you would get doesn't look like what you thought it would? Totally frustrating! But it brings out the creativity so no worries :)

Tuesday, May 3, 2011

Spring...Well, Summer Cleaning

Yesterday was just craft-tastic! I did lots of stuff that you will see in the coming days! One of those things started last night at about 11:30 after the hubs and I got finished eating our Taco Bell! (We eat terribly and at terrible times, but eventually we won't be able to so we figure we might-as-well eat how we want while we can) :) We started organizing our garage! A couple of weeks ago while Blake was mowing the grass, I decided I wanted our garage to not look like a jungle, so I started sweeping and picking up small things and putting them in a pile and moving our outside equipment around, but without shelves, it still looked like a jungle even though I worked so hard! *sigh*

This weekend we bought a lot of stuff for all the crafty things I wanted to do for our house and while we were out we stopped by the shelving area in Wal-Mart and decided to use those handy gift cards from our wedding to get some! We would love to get the super legit ones that can hold like an airplane or something, but those unfortunately are out of our budget. We thought about getting some wire shelf ones, but I was nervous that with some of the smaller things that we have, some stuff would fall through the cracks or fall over or somethings, so we went with a 5 shelf shelving unit that has solid mdf shelves. I looked for a picture but couldn't find one on WalMart's website and I'm doing this post from campus instead of at home so I may upload a picture later of what we have :) It was only $35 so we got 2 and only one has been assembled so far, but Blake wasn't extremely pleased with it. It feels a little wobbly and it says it will hold 900 pounds but when he put some weight on one of the shelves when the whole unit wasn't complete it bent a lot...so that's either because the unit wasn't put together all the way or because it was $35 and you get what you pay for! So far it's holding up though! And he's considering keeping the other one (we were going to return it) so although it's no airplane-holding-shelf it may do for us!

With the help of our new shelf and about an hour and a half of work we went from this: (this is technically a "during" picture because I totally forgot about taking a before picture!)


To This: (Cue fancy bling sound)


Not to shabby :) It'll get better once we give away all the stuff in our give away pile (located behind the lawnmower). And Blake likes to have the lawnmower and pressure washer easily accessible which is why they aren't following the rest of the items in there and are being rebels by facing the garage door! Also, once the other shelf is assembled it will go where that silver table is in the back. It'll form an aisle of sorts so we can store stuff on either side of the shelf instead of just the front if we were to push it against the wall horizontally.

I'm pretty pumped about our garage not looking like death! Maybe one day my car will fit in there too! But that may just be wishful thinking ;) I know! We should get a three car garage! One section for all our random stuff that can't stay outside and two for our cars! Or we could get a storage shed....that'd be kinda cool....oh the wheels are turning now! See what this blog does for me? (if Blake were here, he would say "makes you spend more money" but then I would say "makes me more innovative!") You know, focusing on the brighter things and all :)

How have y'all's Spring Cleaning activities been going? (Can I call this Spring Cleaning? Maybe Summer cleaning since it's technically May...when the heck does Summer start anyway? I say it starts after classes are over, so it's summer to me!) :)

Monday, May 2, 2011

Just Call Me Washing McQueen!

Get it? It sounds like washing machine!!! lol I told Blake what I was planning on titling this blog post and he was like what? huh? I didn't get it... So I figured I would spell it out for you guys since Blake is one of the smartest people I know, but sometimes my cheesiness just passes all logic! ;)

Anywho! Amist all the crazy weather and studying for finals on Wednesday, I was doing the wifely thing and doing laundry! Gooo me, right? I only had one more load to go and I would be all caught up (after doing like four loads...I'm terrible about not doing laundry, can you tell?) So I go in to take the clothes out of the washing machine to put them in the dryer and it's still full of water with clothes in it! And I try to turn the machine on (because I've forgotten to close the lid and turn the machine on, but in hindsight, if I had forgotten to turn the machine on, it wouldn't be full of water...) but it wouldn't come on! I got Blake to come in and look and we determined the problem is probably either the switch or the motor.

Then that night, the tornado tore through my hometown, so I wasn't exactly thinking about laundry for a couple of days. When I did remember though, I was like "that's gonna be gross..." I go look and sure enough there's stuff floating around in the water with our clothes in it....disgusting!!! I forgot to take a picture of this....sorry about that! But it was like some kind of film had formed and when we started to get the clothes out it broke up and started floating around. Oh and it smelled soooo bad. But Blake got me my rubber gloves that my maid of honor had gotten me for my bridal shower and I went to work! This is what we had after I got all the clothes out:


Gross!!! 
Then I moved outside to hand wash all the clothes that were in there and Blake had to figure out how to get all the water out of there. This was my weapon of choice:


And this is me hand washing all the clothes!


Can I just say that as soon as I was outside washing clothes out of a tupperware box with my pink gloves I'm pretty sure my entire neighborhood started coming outside and driving by!! It figures! lol
Anywho, I have no idea if my method was correct, but this was my method for hand washing stinky, dirty clothes:

  1. Fill tupperware box up with fresh water and pour detergent in
  2. Move them around resembling a washing machine (totally failed at this part) ;)
  3. Pour out nasty water
  4. Take out each article of clothing and wring out
  5. Rinse each article of clothing with weapon of choice and wring out as best as you can
  6. Put them in the dryer! (Praise God! I still have a dryer)

While I was doing this, Blake was using his weapon of choice:


Btw, it took 3 full shopvac loads (and we have a 10 gallon shopvac...so 10x3=30 gallons!) I had no idea our washing machine used this much water! Jeez! 

We got everything out and dried and what not! We've decided to buy a new (well new to us, i.e. craigslist) washing machine and dryer instead of getting the washing machine fixed because it is so old that it will probably break down again soon. The dryer is also super old and we've had some problems with it in the past, so I'm pretty excited to get some new stuff! And hopefully they will be front load so I can have a laundry folding place!!! But we'll see and when I know, you'll know, you know? ;)

So! What did you guys do this weekend?