Peacock

Showing posts with label tutorial. Show all posts

Monday, June 27, 2011

The Tack Attack!

A while back I found this image on Pinterest:

{From here}

It is Styrofoam balls covered in thumb tacks and spray painted. So cheap and so chic! I got everything I needed to do this project at Dollar Tree and spent $4. Now, I haven't painted them yet (because as I mentioned in this post I can't decide what color to do in that entry way) but I have them finished and in a vase on the table! Here's what they look like right now:


The how-to is pretty straight forward....Get some Styrofoam balls...


And some thumbtacks:


And just stick those puppies in a line (preferably with a movie...it gets less boring that way) until you have something like this:


I started at the bottom and moved up, but the girl that thought of this idea has also done it starting in the middle; so try it out and see how you like it! In the mean time, what color do you think I should paint these? I think white would not bring in enough color, so maybe some kind of red? I love the color that the original person used (that blue and green are to kill for!) but that doesn't really match anything in my house sooo....I guess I shouldn't do that! What do you think? What color?

Friday, June 3, 2011

The Method To My Chocolatey Madness

I did it! I made those super cute graduation caps from Wednesday's post! It took a little longer than I expected (an hour and 15 minutes), but I think if I did them today I could do them in about 45 minutes now that I have a method down. As a recap, my youth group had a party celebrating the graduating seniors this past Wednesday and I wanted to make something cute, and I found these on Pinterest:


Here's how mine turned out:


I used the method from Bakerella but instead of Godiva chocolate squares (which are a bit too expensive for my taste) I used Hershey's snack size bars and barbecue skewers from the Dollar Tree instead of lollipop sticks! Okay, I'll start from the beginning!

First I stuck my mini-reese's in the refrigerator to try to not have gross sides. But it didn't work...I think it's because they kind of melted on the way home in my car because it is sooo hot these days! See what I'm talking about?


Oh well! Didn't bother me! But I emptied the bag of mini-reese's that I got at Wal-Mart for $2.50, wrapperless on some wax paper, like so:


Then I got my skewers out. They were quite a bit too long, so I "cut" them by making a mark with a pen, making an indention with scissors, and breaking the stick. I got pictures to illustrate! So exciting, right?

Okay, this is the actual length of the skewers...perfect for shishkabobs, but waaay too long for what I'm doing!


So, I made a mark with a pen (all at one time...I layed the skewers out in a line so that I didn't have to mark each one individually and take foooorever), then I made that indentation with some scissors (they couldn't cut all the way through the stick...pansies).


 Then I broke them with my bare hands (I'm such a beast, I know) and put the non-usable side in a pile to go in the trash (I couldn't use them because my reese's were falling apart when I tried to put in the non-pointy side of the skewer...but Bakerella's version uses lollipop sticks that aren't pointy so I must've been doing something wrong)


And put the super awesome pointy ones in the pile to be used (btw, disregard my disgusting cutting board...kool-aid is such a jerk sometimes! But not to worry, it's all clean now!)


Then I stuck the pointy side of the skewer into the flat side of the reese's mini. Then I moved onto the top part of the hat!

I cut broke at the middle seam the snack size hershey's bar so that there were two sections to one hat, like this:


Then I flipped them over and used some yellow cake icing that I got from WalMart in the ready-to-squeeze bag. Well actually, I started out trying to use it without a tip (because I'm a cheapo and didn't want to buy icing tips for one project!). I tried making a straight line with a toothpick, my fingers, everything and nothing worked! Then I got a bag and cut a tiny hole in the corner and that worked like a charm!!


See all the cute little graduation hat toppers! Way to go Mr. Plastic Baggy! :) Also, see that chocolate almond bark in the background of that picture above? That was my glue!

I put one square in a little bowl along with some milk and microwaved it for 30 seconds; stirred, 15 seconds; stirred and scooped some extra into another tiny bowl I had on hand.  Then I used the end of that spoon I used to scoop the extra, to scoop the melted almond bark onto the small side of the reese's mini and stuck the little hats on top of the reese's!

Then I stuck all of them into some packing styrofoam Blake had in the office and let them cool! Which is that picture that you saw above!


And once they cooled, I put them in those red soho cups to be transported.


Then I thought about the hour long drive we were about to make in the 90 degree weather and thought...these aren't going to make it. So I got a big pot and put some lunch freezer blocks in the bottom and put the soho cups in as well. And they made it all the way there in the backseat of my car! Well, actually there were two that didn't make it, but church members were happy to take those off my hands anyway :)

And the party was a success! Everyone liked these little thingies, and told me they tasted good (I don't really like chocolate other than reese's cups, so I didn't try one).

Here's some pics from the par-tay!

Mmmm....Pizza!


Yay! Congrats Grads!! :)


Super cute right?? And I didn't even know the red soho cup would match the decor! Yippee!


Action shot! ;)


Stacy and I manning  womanning the nachos and drinks in the kitchen! (Isn't she stinkin gorgeous?!? LOVE HER!) :)


 And I also made these little guys as presents for the graduates (they're page corner bookmarks!) (tutorial available here!)


Blake made the little beaks made of money on the car ride to the church, aren't they super cute?! Love love them! :)

So that's the story! It was super fun making all that stuff (although I had a bit of a time constraint which made it more stressful that it should've been, but that's my fault) :)

How were your May festivities? Have any graduation parties of note? Or was it all quiet on the western front (or whatever front you're in...like I'm in the southeastern front...okay I'll stop now ;) )? Hope y'all's week has been fantastic and your weekend will be even better! :)

Tuesday, May 10, 2011

Spring Wreath!

I have finally done it! After oogling over a million Spring wreaths for weeks, I have finally made my own! Yaaaaay! :)
I've been trying to bring in some more color onto our porch so that when potential home buyers drive by they notice our house! I added some patio furniture and some pillows to our front porch and the next thing on my list to do was to add a colorful wreath to the door! Blake and I decided we wanted a rectangular wreath since that looks modern and round wreaths look more girly (thought Blake) ;) So off to Hobby Lobby I went! I thought they had paper mache or chip board frames, but they didn't so I had to go to the frame section. Luckily they were 50% off so I got our frame for $8! More than I wanted to spend, but really good considering what we got! And I got an M to paint and put on our wreath. I had already gotten yarn and glue :) Here's how it turned out:


Notice that around the corners, it doesn't get all thick and stuff. That was a bit of a challenge, but once I figured out how I was going to do it, it was super easy! Here's what I mean by thick around the corners:


It's not that it's not cute, it's just not what I wanted with mine :)
So here's how I did mine!

I wrapped the yarn normally around all the sides of the frame, but I skipped the corners and moved over to the other side of the frame (like the three corners below)


Then I cut some strips of yarn (mine took about 30 per corner):


Ran some tacky glue along the edge of the seam where each side meets (it's diagonal) and then put the pieces of yarn on that string so that it looked like this:


Then I did the other side of the seam:


And I put glue along the outside edge of the frame to glue the pieces of yarn down:


Then you do that to the remaining three corners and voila! A yarn frame for your wreath that doesn't get all thick around the corners!

Once I finished that, I made some flowers out of scrap fabric I had left over from my pillows and some random fabric that I have no clue where I got it from. lol

For the M, I mixed two paint colors together so that I didn't have to go buy more paint. I mixed some white and a turquoise color to make a more springy, pastel blue :) Then painted the M an off-white and taped off a chevron print and painted it with the pastel blue I made. Oh and I glued the flowers and the M on with hot glue. So far nothing has fallen off and it's been three days so I think we're good, but if it falls off I'll be sure to let you guys know in case you want to try this! :)

You might be wondering why I haven't put a picture up of it actually on my front door, well the reason is that it's really hard to find a wreath holder in the Spring! I'm having to order one online because all my local stores aren't carrying them right now! Sad face! So when I get the wreath holder in, I'll be sure to let y'all see it! :)

So, have you guys put up a spring wreath? Or any other kind of spring/summer decorations around your house? Does your craft area look like mine, totally destroyed? Or are you a tidy crafter? :)

Thursday, May 5, 2011

No Sew Envelope Pillow Tutorial

As I mentioned in this post, I searched forever for some cute outdoor pillows but to no avail, so I had to make some! And I can't sew....so I just had to rely on my stitch witchery and my creativity! Here's how they turned out:


Here's the steps to making your own no sew envelope pillow!

1. Gather Materials!


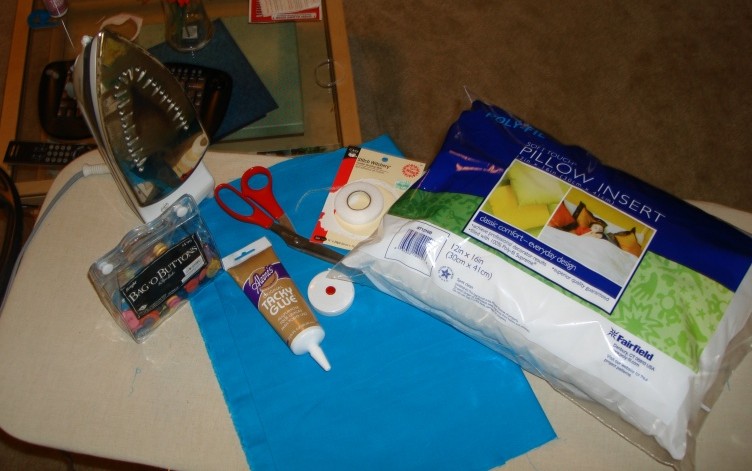
Here's what you'll need:
  • A Pillow (mine was 12"x16" from Wal-Mart)
  • Fabric (I got 2 yards to be safe)
  • Stitch Witchery (available at craft stores, I got mine from Hobby Lobby for $2.29)
  • Measuring Tape
  • Glue
  • Scissors
  • Two Buttons
  • Ironing Board
  • Iron
  • Velcro 
  • Ribbon
2. Measure your fabric

I cut my fabric to be all one piece. It makes it easier to keep things straight and you use less stitch witchery! For the width of the fabric, add one inch to the length of the pillow so you have enough room for a half inch seam on either side (for mine it was 17"). For the length of the fabric, double the width of the pillow and add half of the width of the pillow plus two inches for the seams. So for mine, which was 12", it was 12+12+6+2=32". (if you look at my picture, you'll see 31", but I would recommend adding an extra inch)

3. Cut your fabric

4. Iron Fabric so you don't have any of those nasty wrinkles on your super cute pillow :)

5. Fold your fabric to make a place for your pillow: (make sure if you're using a print that the print you want to show is face down)


Measure the width of your pillow (mine was 12") and add one inch for the seam and iron. That will make a nice fold so you don't have to worry about the measurements changing while you're making the seams and stuff. Also, to be sure your fold is even, check for symmetry by measuring different parts of the fold to be sure they are all 13" :)

6. It's time for the stitch witchery!


Place the stitch witchery between the fabric that you just folded. Then iron with the steam setting on (the stitch witchery package tells you how to do this). Do that on both sides :)

7. Flip your fabric inside out (make sure the fabric is cool so that the stitch witchery has had time to bond your fabrics together)

8. Check to be sure your pillow fits!

9. Fold the raw edges of the top piece towards the middle (about 1/4") and stitch witchery to create a pretty seam!


10. Glue Velcro sections on the top piece and where your pillow will sit so that the top piece doesn't come open.

Start by gluing down one half of your velcro (like the soft side) where the top piece naturally lays.

Then fold your top piece over and mark with a pen on the top piece where the Velcro touches.


That is where you will put your glue dot


Then put your other half of the Velcro set (like the coarse side) on your glue dot


11. Glue your button on where you would like it to go:


12. If you are making an outdoor pillow, use ribbon to secure your pillow to the outdoor furniture.

Place your pillow where you want it to sit and make a small mark for where you need your ribbon to sit:

Then glue your ribbon on top of the mark you made.


And tie a cute bow to keep your pillows in place!


And there you have it! Cute envelope pillows that required no sewing! YAY! :)
Here's some more pics if you couldn't really tell what they looked like:


In all honesty, I will probably be re-making the one on the right. I cut the length too short, so the envelope part doesn't come down far enough. I thought it wouldn't bother me, but so far it's driving me NUTS! It's not like it takes a lot of effort or money...so you may be getting an update soon with pillows that look a little more the same size lol. But it was fun figuring this out and I love that I got exactly what I wanted on my porch! I still have a few more things I want to do, like add a wreath to the door, some fabric to the table, and a plant somewhere up there but for now I'm super happy with my pillows!

What do you guys think? Have y'all attempted to make something after not finding what you wanted at a store somewhere? How did it turn out?