Peacock

Showing posts with label curb appeal. Show all posts

Tuesday, July 12, 2011

Hi There

I finally made a new door mat! I told you guys that after making the new wreath for the front door, making new no-sew pillows, and getting new outdoor furniture, it was about time to have a happy, summery front door mat to finish out the cuteness!

Our old one was functional, but that's about it...Here it is:


It's not like it's ugly...it's just not what I wanted :) So I bought a door mat at Ikea for $4.99 and made plans to spray paint something cute on it in a cute color (very detailed, I know). After looking around Pinterest and google for about a week I decided I just wanted words on it in the bottom left corner so it looked modern and relaxed. I decided on "hi there" because Blake and I say that to each other from time to time while joking (it's from Doug in Up!). Once I decided on what I wanted I went to Microsoft Publisher to help me make it real (I would have used Photoshop, but I know Publisher better therefore it was faster).

I measured the door mat and put the dimensions in publisher so I could get the words the size that I wanted. Once I determined how large I wanted them, I copied and pasted into Word and printed them out! Here's what they looked like:


Then I took my X-acto knife and cut out the letters so that there was a stencil left behind and I taped it onto the door mat like this:


 Then I spray painted that with Krylon's indoor/outdoor spray paint in Blue Ocean Breeze. I also added paper around the edge of those pages once I realized spray paint was getting everywhere (unfortunately it was a bit too late for me to not have a little outline...darn) Anyways, here's how it turned out!


What do y'all think? Should I paint a pattern on the mat to cover up the extra spray paint outlines I made? I've also considered adding a border around the letters using craft paint to make them a bit sharper (definitely should have used painters tape..darn) Have y'all seen this idea on Pinterest and have tried it out? How did yours turn out?

Tuesday, May 17, 2011

Getting Things Done Feels So Good!

I've got some updates for my favorite readers!! I got the Chevron Paintings up and the Spring Wreath hung! Yippee! Here's how they turned out:

The Chevron Paintings:


I have to say I'm pretty excited to have my dining room back to the way it is supposed to be. In order for me to paint, I covered my dining room table with a hot pink vinyl tablecloth so I could paint without fear of messing up whatever I was painting on or burning up out in the garage. So to see my pretty wood table again is pretty exciting!

Here's the Spring Wreath! (Which has come to be known as the "yarn frame" since Blake doesn't think it should be called a wreath since it isn't round)


I found this wreath hanger for $1.50 on Amazon! I got expedited shipping so I could get it sooner and share it with you guys, and it was still only $11! I was super excited :)


I think it helps out with the Look-At-Me-And-Buy-Me factor, don't you? I just heart it :) Now all that's left for the front patio is to get/make a new door mat, get a place mat to go under the candle holders, and maybe put a plant out there!

What do you guys think? I'm thinking that the chevron paintings are a bit small and am considering adding something around them....any ideas/suggestions? Or should I just leave them as they are? 

Tuesday, May 10, 2011

Spring Wreath!

I have finally done it! After oogling over a million Spring wreaths for weeks, I have finally made my own! Yaaaaay! :)
I've been trying to bring in some more color onto our porch so that when potential home buyers drive by they notice our house! I added some patio furniture and some pillows to our front porch and the next thing on my list to do was to add a colorful wreath to the door! Blake and I decided we wanted a rectangular wreath since that looks modern and round wreaths look more girly (thought Blake) ;) So off to Hobby Lobby I went! I thought they had paper mache or chip board frames, but they didn't so I had to go to the frame section. Luckily they were 50% off so I got our frame for $8! More than I wanted to spend, but really good considering what we got! And I got an M to paint and put on our wreath. I had already gotten yarn and glue :) Here's how it turned out:


Notice that around the corners, it doesn't get all thick and stuff. That was a bit of a challenge, but once I figured out how I was going to do it, it was super easy! Here's what I mean by thick around the corners:


It's not that it's not cute, it's just not what I wanted with mine :)
So here's how I did mine!

I wrapped the yarn normally around all the sides of the frame, but I skipped the corners and moved over to the other side of the frame (like the three corners below)


Then I cut some strips of yarn (mine took about 30 per corner):


Ran some tacky glue along the edge of the seam where each side meets (it's diagonal) and then put the pieces of yarn on that string so that it looked like this:


Then I did the other side of the seam:


And I put glue along the outside edge of the frame to glue the pieces of yarn down:


Then you do that to the remaining three corners and voila! A yarn frame for your wreath that doesn't get all thick around the corners!

Once I finished that, I made some flowers out of scrap fabric I had left over from my pillows and some random fabric that I have no clue where I got it from. lol

For the M, I mixed two paint colors together so that I didn't have to go buy more paint. I mixed some white and a turquoise color to make a more springy, pastel blue :) Then painted the M an off-white and taped off a chevron print and painted it with the pastel blue I made. Oh and I glued the flowers and the M on with hot glue. So far nothing has fallen off and it's been three days so I think we're good, but if it falls off I'll be sure to let you guys know in case you want to try this! :)

You might be wondering why I haven't put a picture up of it actually on my front door, well the reason is that it's really hard to find a wreath holder in the Spring! I'm having to order one online because all my local stores aren't carrying them right now! Sad face! So when I get the wreath holder in, I'll be sure to let y'all see it! :)

So, have you guys put up a spring wreath? Or any other kind of spring/summer decorations around your house? Does your craft area look like mine, totally destroyed? Or are you a tidy crafter? :)

Thursday, May 5, 2011

No Sew Envelope Pillow Tutorial

As I mentioned in this post, I searched forever for some cute outdoor pillows but to no avail, so I had to make some! And I can't sew....so I just had to rely on my stitch witchery and my creativity! Here's how they turned out:


Here's the steps to making your own no sew envelope pillow!

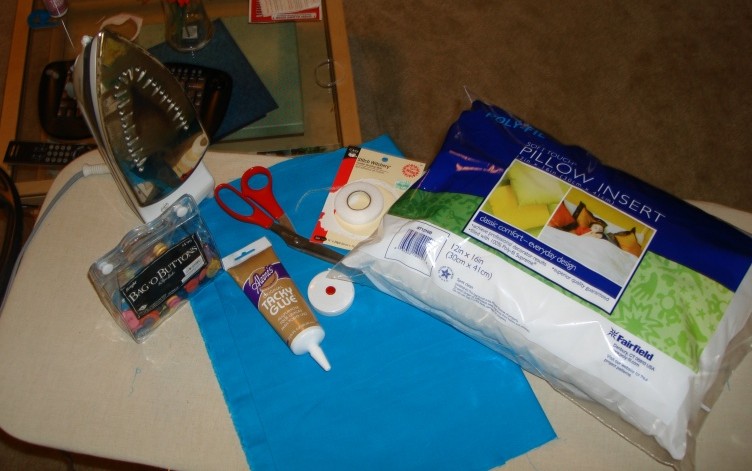
1. Gather Materials!


Here's what you'll need:
  • A Pillow (mine was 12"x16" from Wal-Mart)
  • Fabric (I got 2 yards to be safe)
  • Stitch Witchery (available at craft stores, I got mine from Hobby Lobby for $2.29)
  • Measuring Tape
  • Glue
  • Scissors
  • Two Buttons
  • Ironing Board
  • Iron
  • Velcro 
  • Ribbon
2. Measure your fabric

I cut my fabric to be all one piece. It makes it easier to keep things straight and you use less stitch witchery! For the width of the fabric, add one inch to the length of the pillow so you have enough room for a half inch seam on either side (for mine it was 17"). For the length of the fabric, double the width of the pillow and add half of the width of the pillow plus two inches for the seams. So for mine, which was 12", it was 12+12+6+2=32". (if you look at my picture, you'll see 31", but I would recommend adding an extra inch)

3. Cut your fabric

4. Iron Fabric so you don't have any of those nasty wrinkles on your super cute pillow :)

5. Fold your fabric to make a place for your pillow: (make sure if you're using a print that the print you want to show is face down)


Measure the width of your pillow (mine was 12") and add one inch for the seam and iron. That will make a nice fold so you don't have to worry about the measurements changing while you're making the seams and stuff. Also, to be sure your fold is even, check for symmetry by measuring different parts of the fold to be sure they are all 13" :)

6. It's time for the stitch witchery!


Place the stitch witchery between the fabric that you just folded. Then iron with the steam setting on (the stitch witchery package tells you how to do this). Do that on both sides :)

7. Flip your fabric inside out (make sure the fabric is cool so that the stitch witchery has had time to bond your fabrics together)

8. Check to be sure your pillow fits!

9. Fold the raw edges of the top piece towards the middle (about 1/4") and stitch witchery to create a pretty seam!


10. Glue Velcro sections on the top piece and where your pillow will sit so that the top piece doesn't come open.

Start by gluing down one half of your velcro (like the soft side) where the top piece naturally lays.

Then fold your top piece over and mark with a pen on the top piece where the Velcro touches.


That is where you will put your glue dot


Then put your other half of the Velcro set (like the coarse side) on your glue dot


11. Glue your button on where you would like it to go:


12. If you are making an outdoor pillow, use ribbon to secure your pillow to the outdoor furniture.

Place your pillow where you want it to sit and make a small mark for where you need your ribbon to sit:

Then glue your ribbon on top of the mark you made.


And tie a cute bow to keep your pillows in place!


And there you have it! Cute envelope pillows that required no sewing! YAY! :)
Here's some more pics if you couldn't really tell what they looked like:


In all honesty, I will probably be re-making the one on the right. I cut the length too short, so the envelope part doesn't come down far enough. I thought it wouldn't bother me, but so far it's driving me NUTS! It's not like it takes a lot of effort or money...so you may be getting an update soon with pillows that look a little more the same size lol. But it was fun figuring this out and I love that I got exactly what I wanted on my porch! I still have a few more things I want to do, like add a wreath to the door, some fabric to the table, and a plant somewhere up there but for now I'm super happy with my pillows!

What do you guys think? Have y'all attempted to make something after not finding what you wanted at a store somewhere? How did it turn out?

The Circle of Life

As you know, I've been trying to up our curb appeal lately so we can sell our house. It started with sprucing up the garden area, then buying some outdoor furniture from Ikea, and then I just needed some extra color to draw eyes to our house! I searched FOREVER for pillows and accessories for our patio furniture, trying to decide what color, what I wanted on the table, how much I wanted to spend, you know all the fun stuff that comes with decor decisions. I found these on Pier 1's website and immediately fell in love:
What I didn't love was the price...okay the price isn't that bad, I'm just super cheap frugal, and I didn't want to pay $40 for two pillows! But I finally just gave up after searching around for a better deal for another 2 weeks and debating whether I should just make one. I decided to buy these, because the price difference between me making some and having them already made and cute was just not that much. So off to Pier 1 I went! 

When I got there though, I saw that my monitor's colors must be way off, because the color of the actual pillows were waaay darker and really not a cute springy color like at all. But I figured I would give them a try, I could always return them, right? So I purchased them with a Visa gift card from my aunt and went on home. I also bought this thing for the table which I totally love:

So I get home and sure enough, I hate the pillows. They're just too dark. I want something that makes me smile and think spring when I'm walking into my house! So back to Pier 1 I went. Unfortunately, the gift card which I thought was reloadable was not reloadable at all so I got stuck with a Pier 1 gift card instead. Which stinks because I could have used that gift card to get the fabric for the pillow I was now going to have to make, but it doesn't stink too much because it's still Pier 1 which is totally awesome. :)

So, that is the story of the circle of life, or at least the circle of patio decor decisions. I ended up making the pillows for outside, and I will be putting up a tutorial shortly about that! Spoiler Alert: I can't sew, and I wanted a pillow that looked a lot like the ones from Pier 1!

Has this happened to y'all? Went around and around in your head, finally decide, and then realize that what you thought you would get doesn't look like what you thought it would? Totally frustrating! But it brings out the creativity so no worries :)

Tuesday, April 19, 2011

Inspiration!

So let me begin by saying I am super sorry for not posting in the past like million years! Wow school has been crazy hectic and when I said I was back in my previous post, the stress was just beginning. I still have finals, quizzes, papers, and exams left in this semester that is a mere 2 weeks from being complete (where has the time gone??), but I have decided to not skip out on the things I love (i.e. blogging) for the stuff I could do without (i.e. television)! So I am officially back :)
So here's what I have for you today: Due to the fact that my life has been so hectic here lately I really haven't had time to actually do anything blog worthy, but the rest of the blogosphere has! So I will show you some things that I totally heart and long to do one day when my world is not full of bologna sandwich like building a future by killing my present (i.e. school). All self-pity aside, school isn't that bad when you don't procrastinate (which I am an expert at leading to my present busy-ness). Anyways, Here we go!

I love this picture! I am thinking about getting a bunch of my sisters together and having them make this sign, a heart, and our Alpha Xi sign! That way it could be peace, love, and Alpha Xi Delta (which is one of my favorite quotes in sorority world) :) And then I would want to have it printed super big so that it could hang in my house somewhere and remind me that together we can achieve peace, love, and alpha xi delta!! :)

This is shaping up to be the color scheme of Blake and my new bedroom (once we sell our house and are no longer worried with what potential home buyers will like). I am going back and forth between the brown because it seems a little so last year but I will probably go back and forth for like months and finally decide to go with this scheme after all (I just know myself) ;)

I'm also considering this color scheme! I haven't run this one by the hubs yet, so I feel like it will probably not pass that test, but I love how the dark color draws you in while the lime says "let's have fun!" If we don't do this in the bedroom I would be aye-okay with doing this in another room like the dining room or the guest bedroom :)

I love love love this super dark wood! And super exciting! So does Blake!! Yippee! I love the contrast between the dark wood and the white couch...it just looks so modern! And I am such a sucker for anything modern :) Of course I also love color, so I highly doubt this color scheme would work for me, but throw some gray on the walls and lime green pillows on that white couch and we might have a game plan! But who knows! Tons of time to decide :)

Speaking of my love for modern, how amazing is this faucet?? The super cool thing about it is the color under the water changes based on the temperature of the water! If it is red it is hot, blue it is cold, and fuchsia it is juuuust right ;) I am in awe and in love...I want one!!


These I would love for the kitchen! They are just so...kitcheny! 

This is one of those mega-love-but-would-cost-way-to-much-to-actually-have things...But a girl can dream right? I mean what's not to love about this patio? Actually to call it a patio is an understatement...how about this oasis? Yeah, that sounds about right...with all the greenery and the pop of grass from under the wood and the fountain that encases the whole place, I think oasis would describe it just right :)

Speaking of the outdoors, how cute is this diy yard flag from Peace, Love, and 2 Sisters?? It is made of burlap, an old yard flag sticky thing (that's a technical term), and some outdoor acrylic paint. How adorable! Totally want to do this like tomorrow!

Also I love this blue for a wreath! We're trying to bring some color onto our front porch and I think this would do just the trick!

And last but certainly not least, my laundry room inspiration from Centsational Girl! I love the brightness and happiness of this room. I am terrible about not doing my laundry, so maybe having a cheerful place that is so super cute would help me with my laundry procrastination! Or maybe I'll just walk by and be like "aww so cute...I'll do the laundry later..." Either way, I love it!!!!

So those are some of the things in my inspiration folder! Hopefully I can stop long enough to actually make some of them a reality in my home!
What do you guys think? Any suggestions for bedroom color schemes? Or how about ways to make me do my laundry?? Hope you are having a fantastic day! :)